
V6N1: Artistic Exploration in Game Development Education
By Todd Emma | March 5, 2013
Are video games art? Art and artistic expression encompass many different ideas and areas. Tolstoy, in “What is Art?” states that:
It will likewise be art when a person who has experienced in actuality or in imagination the terror of suffering or the charm of gratification expresses these feelings on canvas or in marble in such a way that others are affected by them. (1)
He breaks art down further to say that art may be created using any method from ballet to baking.
Traditionally digital media arts, such as graphic design and 3D animation, are considered one type of art form and are opening the door for game design to also fall under the generalized heading of art. With the aid of artist friendly game design software, people producing game art are beginning to evolve from engineers and programmers into artists. It is essential that the teaching programs producing these designers are ensuring that the students are equipped with the necessary artistic fundamentals to meet the challenge. These developing game artists will need to be aware that they are capable of shaping society, or on a smaller scale, affecting individuals, and sharing ideas and emotions that require artistic exploration.
Artistic expression has traditionally been taught throughout an art students’ entire academic career. Painting, sculpture and most of the other traditional arts have not changed drastically over the last hundred years and are not likely to change dramatically over the next few months or years. Game design and digital media development tools can change as often as every three months. This is one important difference between traditional art and game design art that creates very different learning environments for the two genres. Game design art relies on highly technical ever evolving software, requiring game design programs to have a heavy emphasis on the technical aspects of game design, coding, modeling and animating. This creates a “learn the tool mentality” environment with minimal attention being applied to the actual ideas or artistic expression of the learner. Attempting to teach both design and digital tools at the same time can be overwhelming to students. How can the basics of artistic expression be instilled in this new generation of digital game artists if we are constantly looking for technical expertise in an ever changing field?
Dena Elisabeth Eber, a well published author and professor of digital media makes the argument in her paper on computer graphics curricula that:
The tool set should be expanded only after students address content and show a level of comfort with the medium. In this way the digital techniques will be one important concern, among others. Further, the students then have time to figure out what they want to express, thus shaping the medium rather than the medium shaping them. (2)
In early sculpture classes, students are given a problem to solve using a limited number of tools and materials. By limiting the tools the instructor can separate the student’s level of ability with the individual tools from the student’s ability to convey his/her artistic expression. An example of this project is to use flat plywood and paint to create a 3D volumetric piece expressing an emotion:
- Problem: Using planes to create volume
- Objective: Create an object using plywood that has volume and expresses an emotion
- Materials: Plywood, glue, paint (for color only)
- Tools: band saw, sander, paint brush
- Dimensions: Minimum size 4’x4’
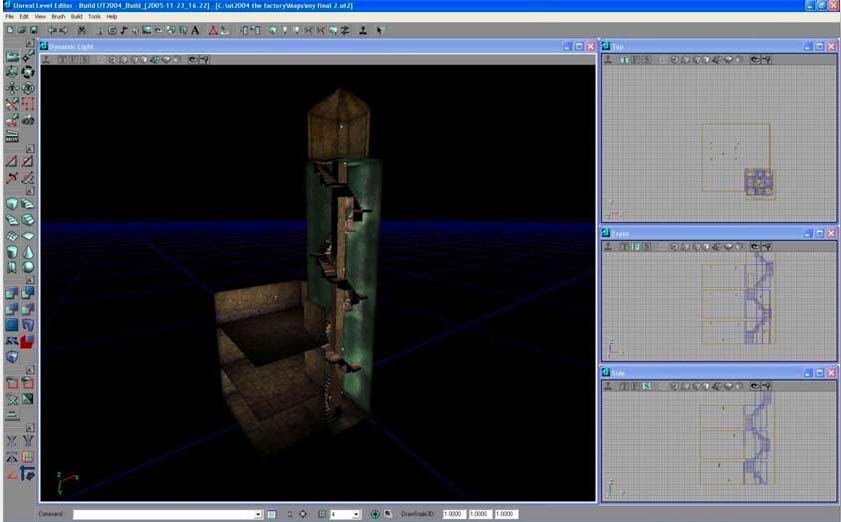
Project A, Fitted Stairs
In digital media or game design curricula, one of the first computer applications that students use is Photoshop. Photoshop, a program that is used to create 2D texture work, is an extremely open ended software package that has a great variety of tools to choose from. Many of these tools can do similar things. The available tool choices in the software can overwhelm students just entering into this field. One guiding technique for this is limiting the available tools that the student can use for a project. Using the ideas from the earlier mentioned sculpture project, students can be guided to artistic expression by using a limited selection of tools, because they have fewer tool choices to choose from they can use more time and energy for creativity. An example of this could be:
- Problem: Creating vector objects for use with raster images
- Objective: Use a self portrait and add a tattoo onto yourself that looks believable.
- Program: Photoshop
- Tools: The pen tool, a self portrait, layers and adjustment layers
Another example of an early project for a game design course that is using a game engine, such as the Unreal game engine is:
- Project Name: Project A, Fitted Stairs
- Problem: Mastering Stairways, using the stair brush tool in Unreal to create a working stair way.
- Objective: Based on provided blue prints of a light house, measure the area and height of the lighthouse tower, then mathematically create a stairway that fits exactly and snaps to the borders
- Program: Unreal
- Tools: Addition stairway brush
These types of limited projects allow the student to focus on the core skill set without being over whelmed by design issues. It also allows the instructor to look at one or two aspects of a tool set creating the opportunity to see if the learner truly understands the tool and masters the technique before adding the next level of aesthetics onto the project. This is helpful for the instructor, the learner, and follows Dena Elisabeth Eber idea of only expanding the students’ tool set after showing proficiency with an existing set of tools.
Is the class room conducive to creative thought and artistic exploration?
Good lessons provide some specific learning goals, practice objectives, and so on. If I ask students to do whatever they want to do, they often avoid risk by doing something they already have learned in the past. The amount of creative thinking may be zero. When there are limits, there is a better chance of having a challenging task. The teacher’s challenge is to make the limits seem compelling and interesting to the student. (3)
In the class room an instructor can help to ensure achievement of specific learning goals by limiting a project’s scope, tools, and/or functionality while creating a strong environment for creativity. This type of work can be built into projects encouraging students to push into areas where they may or may not be comfortable. If the instructor approaches the problem in a manner that is simple to understand but challenging to complete, an assignment can make for an ideal setting for the exploration of artistic expression. Even if a work fails on one level, it may achieve success on another. In a learning environment, we can build from the success and learn from the failure through critique.
What are some steps that can create an environment that fosters artistic expression when designing a lecture or project? Here is a simple list of ideas to keep in mind when setting up a project:
- Define all materials and tools that can be used. In digital media and gaming we can have size restrictions in kilobytes and polygons, make sure to roll these ideas into the project when appropriate. Define the software that can or should be used. Show why that software was chosen.
- Keep the projects small. If there is a need for a large project, break it down into smaller projects then use a milestone system to allow the student to achieve small goals along the way.
- Encourage creativity, “In any list of grading criteria, originality must have more importance than neatness. Neatness is style - not substance. As a style, it can get some credit, but other styles need to get just as much credit.” (4)
- Start with interesting ideas; if the student wouldn’t naturally go to it, see it, or play within it, then why is the student making it? An example of this in level design is the student that wants to create a mod from his or her dorm room or classroom. Ask the student if they would go to either of those places given a chance to choose other locations. The answer is usually no, than ask them why anyone else would want to go there?
- Try to keep the project limited but not sterile; clearly define specific problem that need to be solved. Create a well defined question for the students to answer.
Students do not always see the outcomes of a particular project; this impedes creativity and learning in the class room. By setting up some basic lines of communication between you and the student this can be overcome and may help to create a successful project:
- Determine whether the project is intended to be based on form or function. This idea may seem obvious but to students just entering into a new software program, it can be difficult to see.
- Discuss the difference between form and function for each project. When something is functional, above all it needs to be able to do whatever the thing’s function is. When something is designed for form, above all it must be appealing to the viewer’s eye. Projects that try to encompass both of these concepts early in a students learning process often overwhelm the student.
- Promote ownership of projects. Do not give students confining projects; instead present them with challenges. Give simple guidelines, present problems and then allow students to solve them. This will give the student a feeling of ownership over his or her own ideas and in the process will push them to be more creative in the project.
- Documentation is essential; have the students draw up an idea before starting even the smallest of projects. From the beginning, make sure that the student has a clear idea of what he or she will be creating. Even just writing a quick paragraph that describes the base idea will work. This helps the student to articulate an idea and use it as a reference to set the scope of a project and prevent “feature creep”.
- Document all the technical aspects of a project before they begin production. For example when you build a house you identify needs, get a budget, decide on materials, and gather a team together then start production. This preplanning saves mistakes and time. When designing a project, students need to approach it with the same idea of process. What will it look like? What assets will be used? Who will do what? What are any other essential problems that need to be addressed? Asking and answering questions such as these is an essential phase of the artistic design process.
- Have the students create a time-line with project milestones for larger projects; on most projects there are deadlines and goals that need to be achieved by key points. It is important that these goals are agreed upon early in the project. Often a student will only be given a project and a due date. This is counterproductive, by establishing many small dates that specify what should be finished by these milestones the instructor and the student work closer on a project. The instructor should not see a project for the first time when it’s due. Often in a production environment there are alpha, beta, and release.
By incorporating these small incremental steps, documentation, and ownership concepts into a class, students can successfully complete large, complex project assignments while incorporating a creative approach.
An example of this type of project is Project B Designing a Single Space it incorporates these ideas.
Project B: Designing a Single Space
Project B Designing a Single Space is a project from the second class in a level design sequence. This class requires that the student has taken a modeling class, a level design class, and a scripting class. The project takes roughly ten weeks and should achieve a deliverable in game cinematic that can be captured as a digital movie clip.
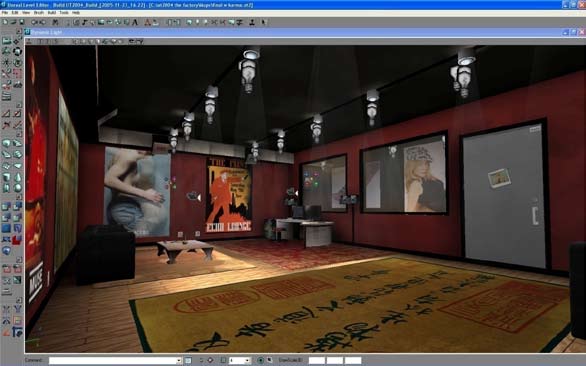
Project B Designing a Single Space
Project Name: Designing a Single Space
Problem: Design a creative and interesting single space environment that will use the matinee tool set in a game engine to create a short cinematic for in game use.
Objective: This project does not create a playable level it only creates an environment for a cinematic to take place. Create a portfolio quality animation sequence using the game engines built in animation tools, implementing high resolution textures, low polygon models, lighting, shadows, emitters, triggers, projections maps and other visual elements that demonstrate your best ability to create a visually appealing room.
Tools: Unreal, Photoshop, and 3DS Max or Maya.
Constraints: Not more than one room or space, all polygon models must be optimized, the base of the room must be a subtraction brush from Unreal, this is a single person project, it must be completed in ten weeks.
Milestones:
- The first milestone will be the initial paper work.
- A one page description of what you will be doing and timeline. >>A list of all models and textures to be in the scene.
- The second milestone will be the initial geometry in the Unreal engine that you are planning on using as your space.
- The third milestone will be that you have started your modeling.
- The fourth fifth and sixth milestones will be a percentage of the models done, the percentages will be determined by you in your timeline.
- Milestone six one hundred percent completed models and textures.
- Milestone seven, creating lighting and special effects for your scene.
- Milestone eight, have completed your interaction and begun play testing (in this case showing the work to your peers for critique).
- The Final milestone on the tenth week of the project will be your presentation to the class.
A successful idea to keep students creative is using themed projects from the earliest classes. This helps to get students entering into a program excited about the program. An example of this, in an intro to Photoshop class, is to ask what the level or mod is that they plan on creating later. Share with them some of the upcoming projects in other classes. Then ask them to design textures that will be used in later projects. Help them to see that they are creating a library for future use; not just a project for intro to Photoshop. When it comes time to assign a project to students in their first few classes, it is important that you do not overwhelm them. Keep the projects simple, and have clear outcomes. This does not mean make the projects easy, make them either about function or form but steer away from projects where the student will need to learn new software and new artistic ideas at the same time.
Also tying two or three small projects together or including graded milestones can have great success. For example if in the first project the student creates a model and in the second project he/she creates a lit scene, then in the third project he combines the two things the milestone are clear, and attainable. This way you and the student are able to gauge the student’s ability to do each part of the project. You will improve the chances of not overwhelming the student, and can achieve a large advanced project.
Project C Outdoor environment
In Project C, students can see examples of different elements at work and not know where to start. This project is broken down into several small steps for the students, textures, models, environment, lights, animation and interaction. By working on each small milestone, the student isn’t able to create weak work in any one area unnoticed. Each step needs to be treated as an important part of the project; paper work is of equal importance to modeling.
An example of a complex project that can be broken into several smaller assignments is Project C Outdoor environment this project is from the third class in a game design sequence. This project is extremely large at the end; to keep it manageable for students it is broken down into multiple smaller milestones. This class requires that the student has taken a modeling class, a level design class, and a scripting class. The project takes roughly 12 weeks and should achieve a portfolio quality mod.
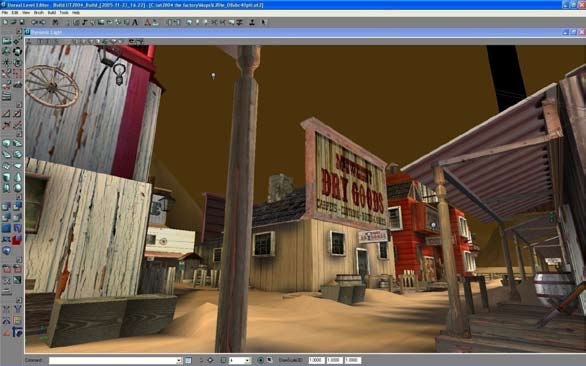
Project Name: An outdoor environment
Problem: Design a creative and interesting outdoor environment that will use a figure eight style arena.
Objective: To create a portfolio quality piece that is functional as a playable level, using high resolution textures, low polygon models, lighting, shadows, emitters, triggers, projections maps and other visual elements that demonstrate your best ability to create a visually appealing area.
Tools: Unreal, Photoshop, and 3DS Max or Maya
Constraints: All polygon models must be optimized, the base of the arena must be a subtraction brush from Unreal, this is a team based project, it must be completed in 12 weeks.
Milestones:
- The first milestone will be the initial paper work.
- A one page description of what you will be doing and timeline.
- A list of all models and textures to be in scene.
- The second milestone will be the initial geometry in the Unreal Engine that you are planning on using for your arena.
- The third milestone will be that you have started your modeling.
- The fourth fifth and sixth milestones will be a percentage of the models done as laid out by you in your timeline.
- Milestone six being one hundred percent completed models and textures.
- Milestone seven will be to create lighting and special effects for the scene.
- Milestone eight, have the interaction completed and begin play testing.
- The final milestone on the 12th week of the project will be the presentation to the class.
The teaching method discussed in this paper lays out projects with complex ideas while maintaining simple constraints and objectives. This idea of simple steps helps students to achieve a more artistic approach to game design projects. By breaking down each piece of a project for the student, into small concise steps, a project with more artistic expression is achievable by allowing the student to focus on the design instead of the tools. By presenting students with problems that need to be solved instead of minimum requirements, we start to create an environment that explores creatively from the beginning of the project. Combining these ideas with verbiage like “create an interesting space” and “create work that is portfolio quality”, students explore their own artistic expression and feel ownership of the project, rather than just doing assignments. By instilling this ownership in game design programs we can create a space where artistic expression is explored and new creative processes can be learned simultaneously without sacrificing either.
Footnotes:
- Leo Tolstoi, What is Art? (Toronto George N. Morang, 1899), 73.
- Dena Elisabeth Eber, “Computer Graphics Curricula in the Visual Arts,” Computers and Graphics, vol. 24, no. 6 (December 2000), 919-23. 5
- Marvin Bartel, “Ten Class Room Creativity Killers,” (October, 2008 ). http://www.goshen.edu/art/ed/creativitykillers.html (February 4, 2008).
- Marvin Bartel.
References:
Busby, J. & Parrish Z. & Eenwyk, J.V.. Mastering Unreal Technology: The Art of Level Design. Indianapolis: Sams Publishing, 2005.
Bartel, Marvin. “Ten Class Room Creativity Killers.” http:// www.goshen.edu/art/ed/creativitykillers.html. (accessed February 4, 2008).
Eber, Dena Elisabeth. “Computer Graphics Curricula in the Visual Arts,” Computers and Graphics, vol. 24, no. 6 (December 2000), 919-23.
Thompson, J. and Barnaby B.G. and Cusworth N.. Game Design. Hoboken, NJ: John Wiley & Sons Inc, 2007. Tolstoi, Leo. What is Art?
Toronto: George N. Morang, 1899.